MENU

Dye

Splatter Dye, The Sequel

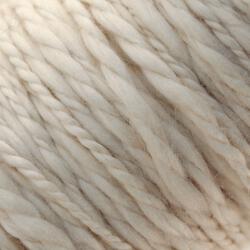
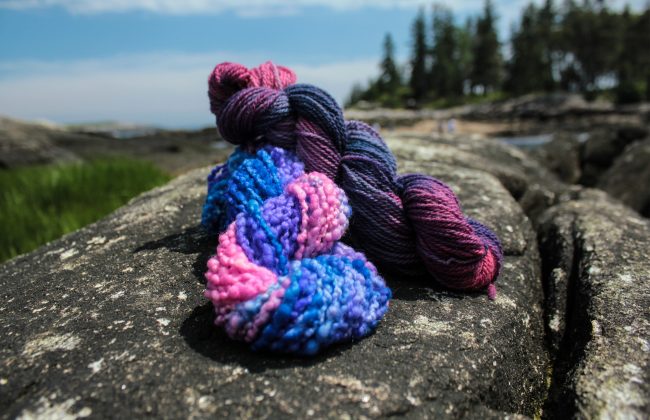
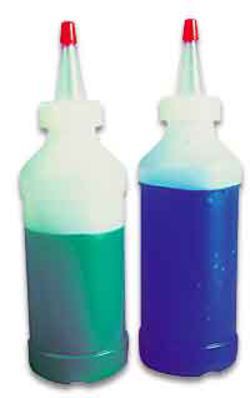
I. Love. Splattered. Yarn. There, I said it. And if you caught my earlier post about trying to accomplish that elusive (to me) effect with my own hand dyeing process, you’ll be interested to learn that I think I figured it out. Using a skein of [Sorry, item discontinued or temporarily out of stock] , some Wash Fast Acid Dyes - 1 oz. 338 Magenta and Country Classic Dyes for protein fibers COC77 Mt Aqua , I managed to get a little closer to my dream yarn.


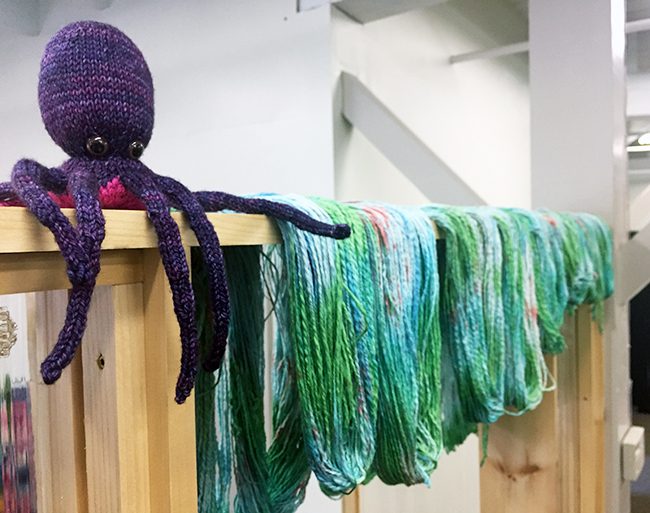
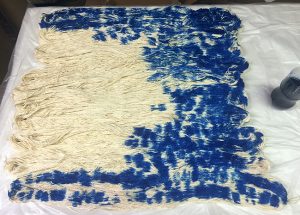
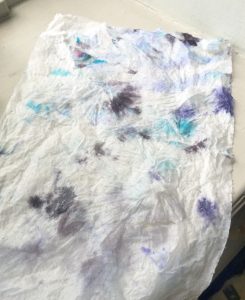
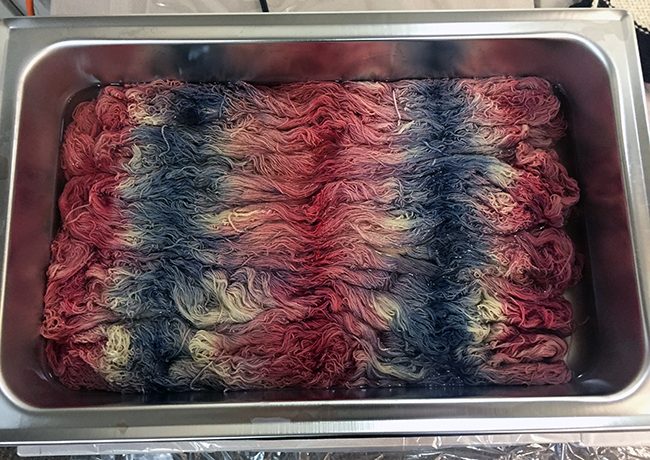
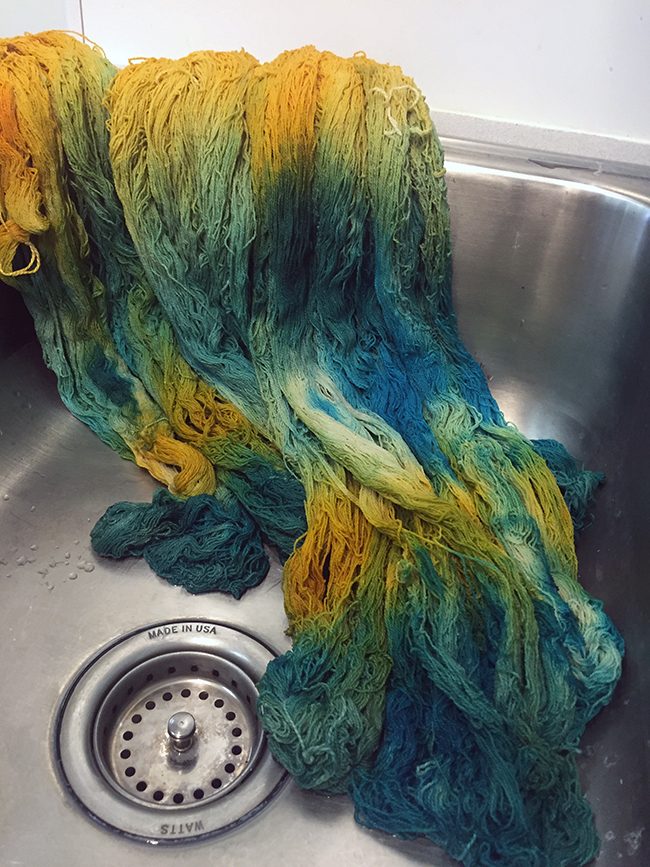
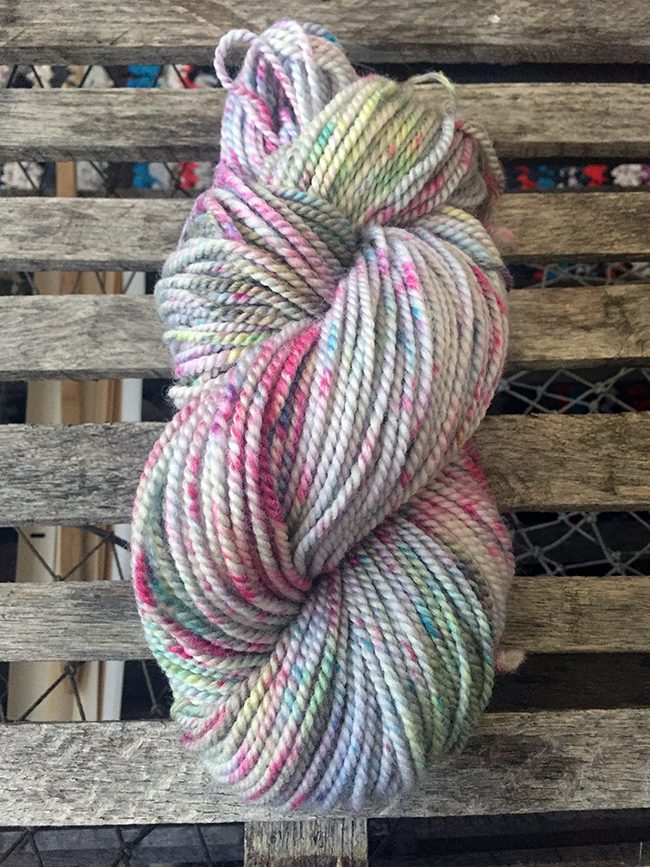
The skein I used for this project was actually a casualty from my first splatter attempt. It was meant to be bold speckles of aqua, green and yellow, but it ended up blending together and turning everything an unfortunate shade of booger. This was due to two reasons: The yarn got too wet during the heating process, and I didn’t get it hot enough for a long enough time to make the dye set. So I soaked it in vinegar and water again, squeezed out as much excess moisture as I could, and laid it out on my work surface.

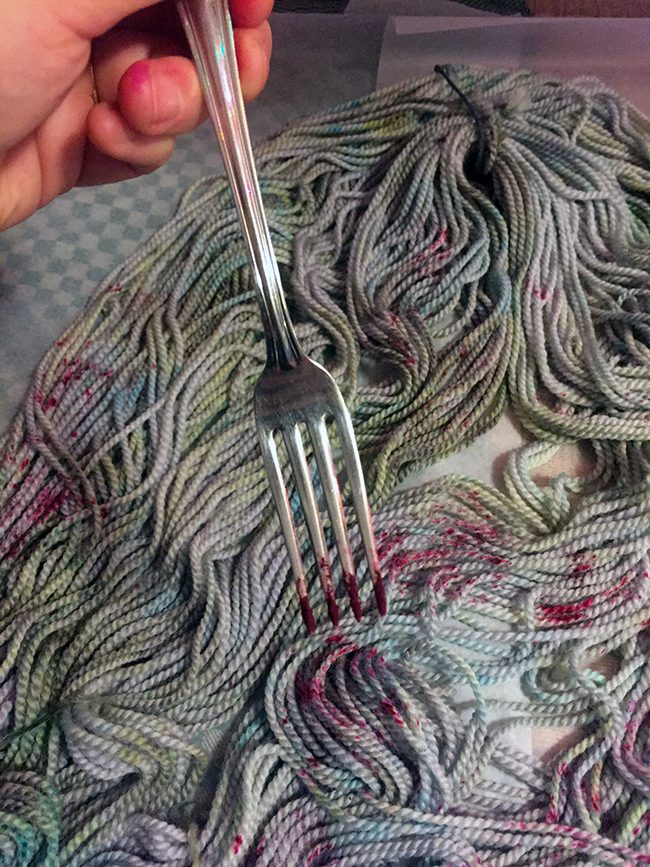
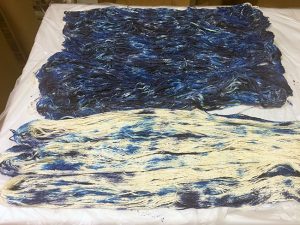
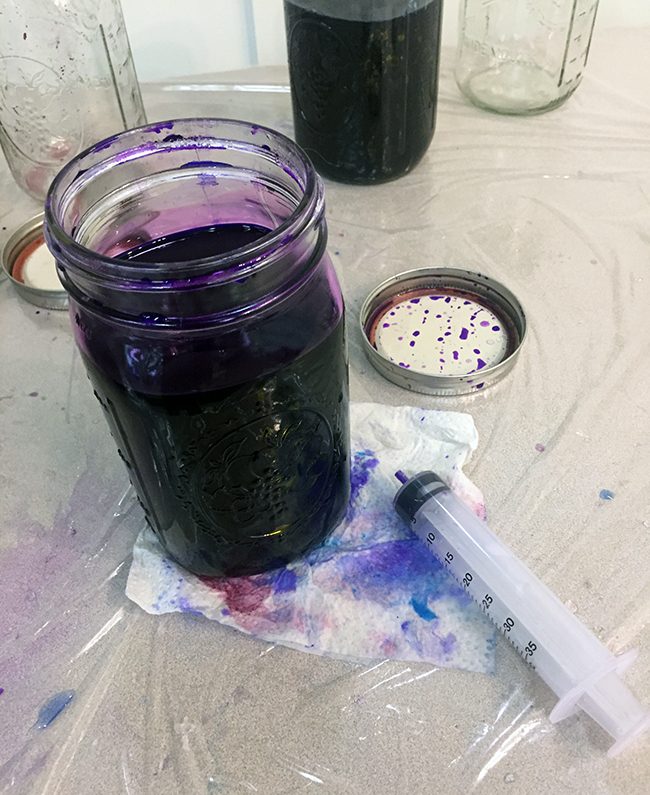
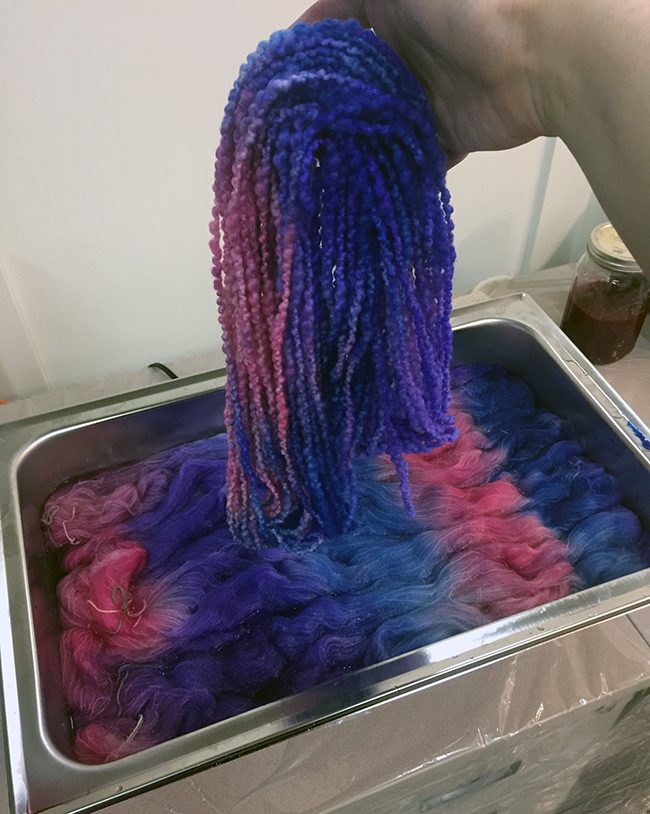
You might be able to tell from the photo, but instead of mixing my dye first, this time I dipped my fork directly into the dye powder. Applying dry dye powder is awesome because it gives you those concentrated spots of color and it stays where you put it with little to no bleeding. However, it can be awful because as soon as a drop of water hits those powder spots, things can get out of hand very fast. You win some, you lose some, right?

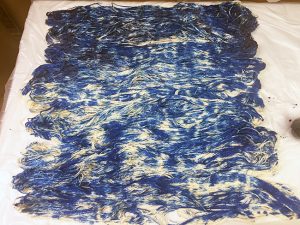
After applying the color, you have to heat the yarn for it to set. My first attempt didn’t work because I used my clothes iron on it’s highest steam setting, hovering it over the skein and slowly moving it back and forth for about 10 minutes. Ok, maybe 5 minutes. I can laugh at this now, but anyone new to using these dyes might make the same mistake. So I’m here to tell you: To set your dye, the heating method needs to be hot, even, and somewhat longer than you want it to be (i.e., once it goes on heat and you have a snack, it probably won’t be done by the time you’re done munching).

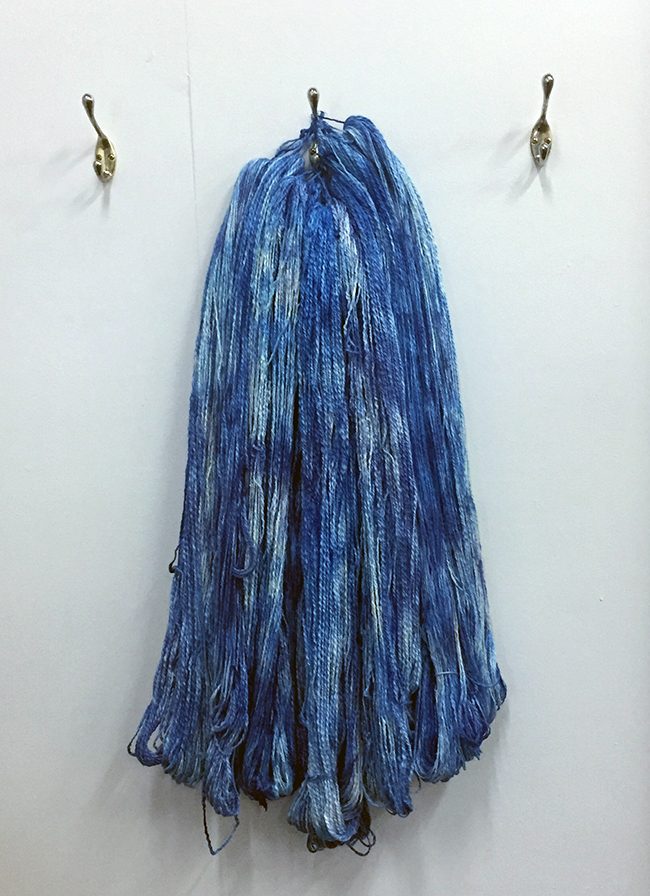
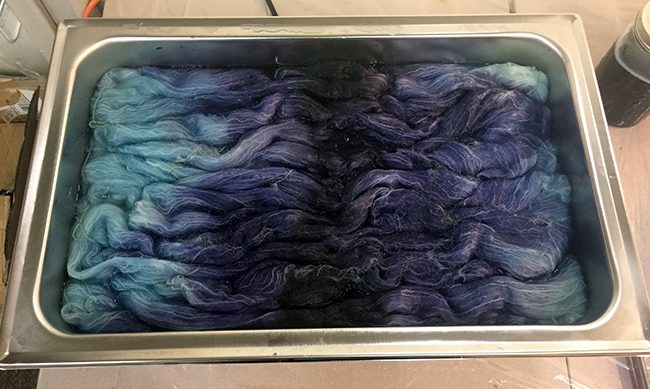
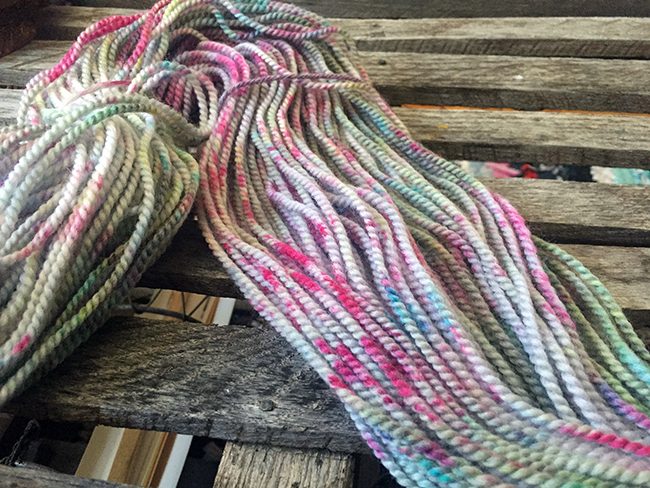
So. This time I left the damp yarn on the baking sheet, covered it with aluminum foil, and stuck it in a 350 degree oven. I checked it frequently, as I was worried about burning the yarn. After about 30 minutes, I removed the yarn from the oven and allowed it to cool fully. Rinse, dry, and here’s what I got:

Since the skein of yarn I used for this project (Norumbega Yarn) boasts such generous yardage and is known for its sturdiness, I’m definitely going to make a pair of mittens out of it. Not until after I dye all the white yarn in my house, though!


Related items of interest: • Dyeing DyesOur yarnsMedium weight yarnsWool yarns

Natural Color

Did you know that you can use onion skins for dyeing? Have you ever seen the different shades of pink you can get from avocado pits? Author Sasha Duerr describes the nuances of color you get from these and other common plants in Natural Color, the latest addition to our dye library.


I was recently lucky enough to attend two dye classes here at Halcyon – Natural Dyeing and Indigo Dyeing, both taught by the super knowledgeable, very cool Jackie Ottino Graf. These classes were incredibly informative, and I came away with enough information (and inspiration) to finally approach this craft more seriously. Prior to taking these classes, I was openly confused and befuddled by mordants and modifiers. Let me tell you, I wish I’d had this book!

I wouldn’t go so far as to say one book, however well written and beautifully photographed, could teach you as much as spending time with a professional dyer – but this one comes close. Organized by season, Duerr highlights a range of plants and demonstrates the many hues each plant can yield. With easy to follow descriptions of the different elements used to create a natural dye bath, this book can help demystify the process for beginners as well as serve as a great reference for more seasoned dyers.

Not only does Natural Color include a wealth of information – Duerr also provides quite a few projects that will almost certainly inspire you to give dyeing a try.


In the above project, Linen pillowcases become a beautiful study in blue to pink gradients when using avocado pits. Adding iron to the dye bath turns it from shades of pink to shades of lavender and gray. Duerr gives you a list of materials needed and step by step instructions on how to do this and all of the other projects included in this book. That was especially helpful when I saw this:

That’s a leather bag! You can dye leather! Alternately, you could use cotton canvas, linen or hemp fabric. Duerr tells you how to dye your piece of leather (or fabric) using purple-leaf plum tree branches, then sew it together into a fashionable bag. Don’t care for sewing? Duerr shows you a few options for altering already made clothing, like this child’s dress (below) that was dip dyed in oxalis (also called sour grass) flowers, leaves and stems.

In the world of natural dyes, indigo is pretty unique. I can totally understand why an entire class could be dedicated to this plant, as it has so many nuances and such a rich history all over the world. The beautiful shades of blue are color-fast, withstanding many washings. This makes it a great choice for sheets and other linens that require frequent laundering.

Using a combination of dip dyeing and shibori, Duerr shows you how to create your own bohemian bedding. Don’t worry – she explains how to do each technique in detail. I must admit, at this point in the book I have officially decided to only ever buy white, natural fiber textiles from now on. I love the big impact indigo has on large pieces of fabric, and I just want to hang these all over my walls!

Speaking of walls, check that out! Using sweet gum leaves to create a watercolor wall wash, this is then applied directly onto your wall (or watercolor paper or other textile). I love accent walls, and what a cool way to do it.

Following the excitement of all these projects (there are way more than I have mentioned, mind you!), Natural Color has a chapter on different mordants and modifiers. All of this scientific process is explained, with special attention to conservation of water and resources. Everywhere in this book, you will pick up advice and tips for making every step of this process as natural and gentle on the environment as possible.


This is a large book, and no space is wasted. Each turn of the page reveals a beautiful color, plant, or project that will make you itch to give natural dyeing a try. Natural Color is a wonderful tome of knowledge, and it’s lovely enough to leave out on the coffee table. Great for beginners and experts alike, this book will make a welcome addition to any dyer’s library.

A few more favorites for your collection of colorful tomes…


[item= 57290400,book] Wild Color [item= 57040300,book][item= 57040200,book][item= 57161000,book][item= 57290300,book][item= 57260000,book][item= 57210000,book][item= 57340100,book]


Related items of interest: • Dyeing Books

Portrait of Sierra Roberts
by: Sierra Roberts

Making the Hand Dyed yarn line


This summer, Halcyon Yarn is excited to present a new line of hand-dyed yarns!

Do you often find yourself gazing adoringly at dip-dyed, tie-dyed, kettle-dyed, and hand painted yarns? Me too. Even if you don’t want to stain your hands (and countertop… and floor) making your own, we’ve got you covered. I’m excited to introduce to you a very special, very limited run of hand-dyed Halcyon Signature Victorian 2-Ply, Victorian Mohair, Silk Noil, and Organic Cotton.


Of course I can’t just show you a new product, especially one that I made myself, without telling you all about how it came to be. You see, for the past month or so I have been a mad scientist at the dyepot, trying different color combinations and techniques on different yarns. And then I’ve gone home in the evening and done that some more in my own kitchen. Needless to say, I have left a trail of colorful yarn in my wake everyplace I’ve gone.

Once I decided on the yarns and colors, we needed to figure out how to do this on a larger scale. This is about the time I started wondering if it was too late to take a trip to Uruguay, where I could take a peek at how Malabrigo does it. Seriously though, there’s a big difference between hand painting one skein of yarn as compared to ten. In the end we decided to use those simple large metal warming pans you see at catered events – a yarn buffet! Fiber artists are nothing if not resourceful. But first I started dyeing the Inca Organic Cotton Yarn, which doesn’t require any heat or pots and pans:


Here’s what those messy looking skeins turned into:

(Click here to read my post about dyeing cotton!)

When you’re dyeing one skein at a time, you can really control (not to mention just plain see) where and how the color is applied to each specific spot of yarn. It’s not quite so simple when you add more skeins – depending on what kind of vessel you’re using, some of those skeins are likely to have to sit on top of others and things are likely to get a little more crowded. The magic of kettle-dyeing is that the yarn creates a barrier for the dye, thus preventing all the colors from running together during the process. That magic is also a huge problem when you’ve got ten skeins squished together in a little pan. In order to make sure the dye covers the yarn evenly, a little extra manipulation of the skeins is necessary. Tongs and syringes, a plastic spoon, and (gloved) fingers were all put to work poking and prodding the yarn.  Check out these photos of my work in progress:

The results?  Each batch of yarn was a delightful surprise, planned as it might have been. Within a single batch, there are skeins that came out a little lighter and softer colored and skeins that have bright, saturated areas of color. Our offices were draped all over with drying skeins of yarn and it felt like such a wonderland, I snapped a few photos:

As you can see, this yarn was kettle-dyed in very small batches. Great for adding a bright accent to a piece,  I especially love pairing a bright colorway with a neutral yarn in stripes or other colorwork. These hand-dyed yarns can also be used on their own if you’re looking for an all over colorful textured effect, but keep in mind that quantities are very limited – so snag a skein of your favorite colorway before they’re all gone!


Related items of interest: • Our yarnsMedium weight yarnsCotton yarns

Portrait of Gretchen
by: Gretchen

July to Dye for!


July to Dye for!

With long bright days and flowers in bloom, July is an all out celebration of color! Join us throughout July as we explore dye techniques, share limited edition hand-dyed yarns and projects, meet some talented dyers, and feature great deals on some our favorite color and dye resources…

Here are a few things to consider before you dive into the dyepot!

Which dye is for which type of fiber?

Country Classic and Wash Fast Acid Dyes for Protein Fibers (animal based): including wool, mohair, alpaca, and silk. Acid dyes also work for nylon, but not other synthetic fibers.

Procion Dyes for Cellulose Fibers (plant based): including cotton, linen, hemp, rayon, tencel, and bamboo.

Many natural dyes can be used on either protein or cellulose fiber, and will produce somewhat less predictable results than their synthetic counterparts.

Note that most synthetic fibers will not dye well for the home-dyer. Synthetics are essentially petroleum (plastic) based materials and the color is already part of the material. The most you can do at home is to “stain” the lighter colors.

In yarns that are a blend of fibers, you can achieve some really interesting tonal effects, since each fiber will take the color a little differently. A couple of examples of that are the Halcyon Signature Block Island Blend, and Juniper Moon’s Moonshine Chunky.

In the [Sorry, item discontinued or temporarily out of stock] , you can see how the wool, alpaca, and silk each take the dye differently, with the silk absorbing color the least to give the yarn a heathery highlighted effect within the blend.


Block Island Blend Yarn combines three separate plies, unlike the “intimate” blend of Moonshine. Each ply is a different cellulose fiber: linen, cotton, and rayon. Again, the differences in how each fiber takes the color give the yarn great depth from a single dye bath!


Be safe!

Please wear gloves, and be cautious with the heat and chemicals involved. Tools like pots, spoons and tongs should not be used for food preparation once they’ve been used for dyeing. If you are dyeing outside, don’t dump the dye bath or rinse water into your lawn or outdoor drain, as this can cause problems for plants and wildlife. Remember, even natural dyes and mordants are chemicals and can cause skin or respiratory irritation so always make sure you have plenty of good ventilation. Keep kids and pets safely out of the way. Dyeing can be a great summer activity with kids, but it should always be supervised!

Basic tools for getting started…

You’ll decide what is necessary depending on your space and the amount of materials you’re working with, but here are a few tools to consider before you get started. Many of these are things you already have, or can find inexpensively at the grocery or hardware store. Don’t use any tools you’ll want to use for cooking with again, once dyed with they are forever more dye equipment!

  • Most dyeing can be done on a kitchen stovetop, but if you prefer to work outside or in another space, a portable burner is a great tool. You can get an inexpensive electric burner or butane fired camping stove at most hardware stores.
  • A dyepot or three! We recommend a plain stainless steel cooking pot, or lobster pot with handles. You can often find these at thrift stores in the homewares section.
  • A long handled stirring spoon and/or tongs are helpful for stirring the pot as well as lifting the yarns up during or after dyeing.
  • Squeezy Bottles! These 8 oz Squeeze Bottles are great for laying on precise amounts of color and keeping your colors organized. They also make for less mess when applying dye to a warp, piece of cloth, or skein/fiber in a shallow pan.
  • Glass Jars, like a clean baby food jar or mason jar. You can store mixed dyes for several months in a tightly closed glass jar. Just label them with some tape so you know what colors you have and when you mixed it!
  • Gloves and, if you are mixing colors, you may also want a basic dust mask.
  • A drop cloth, tarp, or plastic sheeting to protect your space.
  • Drying rack or clothes line. You can always hang things in your shower too after rinsing, but be careful where you dry, as excess dye may drip out and stain.
  • An extra plastic bucket or two is helpful for transporting wet skeins, or for mordanting or pre-rinsing your fibers.

Natural Dye Classes!


If you’re in the area, join us next weekend for natural dye classes with the wonderful Jackie Ottino Graf. Saturday July 8th is Natural Dyeing for Beginners, and Sunday July 9th is Indigo Dyeing for Fiber Artists. Both are from 9:00 am to 4:00 pm and materials are included.

Natural Dyeing with Jackie Ottino Graf

Saturday, July 8 • 9:00 am – 4:00 pm

Indigo Dyeing with Jackie Ottino Graf

Sunday, July 9 • 9:00 am – 4:00 pm


We’re here to help!

Call or email us if you’d like a little advice or are planning a project – we’re happy to help you find the right yarns, fibers, and tools. Most importantly, have a sense of adventure. There’s no “wrong” color, only a spectrum of happy accidents… Whether it’s fireworks, flowers, or a bubbling cauldron of fiber, we’re excited for a cacophony of color all month!


Related items of interest: • Our yarnsFine weight yarnscotton blend yarnsDyeing Equipment